Post
ASP.NET Core - Best practices (tips and tricks) - an opinionated approach - Part 1
Introduction - ASP.NET Core Best Practices
This post is about ASP.NET Core best practices post. We will talk about some of the best practices while working with ASP.NET Core. It is a collection of tips and tricks, different strategies and approaches to make your code and project easier to maintain. Also, it will be more pleasant to work on the project. These include the ways to organise the solution, project, pieces of code, tips for writing tests and other things that developers deal with.
This post is heavily inspired by Scott Allen’s great talk from NDC London, where he talks about 50 things that he practices while working with applications that use ASP.NET Core. With Scott’s blessing, I decided to take some of the things he talked about and put them to the writing. I will use my notes and try to convert them to a blog post that might just be useful to someone. I will also add some of my views and point out some things that just arrived with ASP.NET Core 2.
This is the first of two posts on this topic. You can find the second post here.
Repository Structure
If you look at any of the ASP.NET team official projects (MVC, SignalR, Logging etc.), you will notice a pattern.
Let’s look at an example for ASP.NET Core SignalR repository:
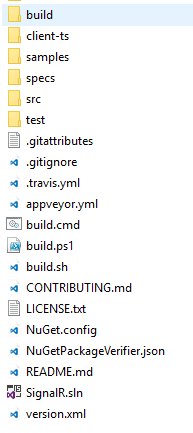
Do notice important files in the root folder.
Let’s see what important things we should have in our root folder and how should we organise our repository:
- solution file (SignalR.sln)
- README
- build scripts
- .gitignore
- src folder
- project folders - for code
- .csproj files for code
- project folders - for code
- test folder
- project folders - for test
- .csproj files for tests
- project folders - for test
- samples folder
- documentation folder
Too Many Projects
As Scott points out, don’t fall into “every class should be a project” trap, there is no need to have dozens of projects when you are starting out.
Point is to not start with too many projects inside our solution. Start with the Web project, maybe another project for Database and a separate project for Core/Common things. You should also have one test project for unit tests. After, as your application grows you can extract things into separate projects.
Startup class
Three responsibilities of Startup class:
- Constructor - Configuring the configuration system (app.settings.json, ENV variables, .ini files)
- ConfigureServices method - Configuring the container (for DI), which is adding the services to our application
- Configure method - Build HTTP processing pipeline - middleware
We should not do logging configuration or any configuration set up inside of Configure method. Instead, we should do that sort of configuration inside of Startup constructor.
ConfigureServices should be clean and readable. We can extract chunks of code to extension methods.
Example for adding SignalR related things inside of ConfigureServices:
public void ConfigureServices(IServiceCollection services)
{
    services.AddMvc();

    services
        .AddSignalR()
        .AddRedis();

    services.AddSingleton(typeof(DefaultHubLifetimeManager<>), typeof(DefaultHubLifetimeManager<>));
    services.AddSingleton(typeof(HubLifetimeManager<>), typeof(DefaultPresenceHublifetimeManager<>));
    services.AddSingleton(typeof(IUserTracker<>), typeof(InMemoryUserTracker<>));
}
We can, and we should separate code related to adding SignalR and its dependencies in a separate method.
public static class IServiceCollectionExtensions
{
    public static IServiceCollection AddCustomisedSignalR(this IServiceCollection services)
    {
        services
          .AddSignalR()
          .AddRedis();

        services.AddSingleton(typeof(DefaultHubLifetimeManager<>), typeof(DefaultHubLifetimeManager<>));
        services.AddSingleton(typeof(HubLifetimeManager<>), typeof(DefaultPresenceHublifetimeManager<>));
        services.AddSingleton(typeof(IUserTracker<>), typeof(InMemoryUserTracker<>));

        return services;
    }
}
Our ConfigureServices method looks much cleaner now:
public void ConfigureServices(IServiceCollection services)
{
    services.AddMvc();

    services.AddCustomisedSignalR();
}
We should also keep Configure method clean and separate pieces of code into middleware classes - extensions.
Logging
Keep your logs structured! Structured logging is when you keep a consistent, predetermined logging format.
With structured logs, it is easier to navigate, filter and analyse the logs. Since most of our logs are consumed by machines like tools (apps, Uis) this is a must!
ASP.NET Core has logs structured by default, and ASP.NET Team decided to make it consistent throughout the entire code. From the web server to the application.
Serilog is an excellent logging framework. Also, it is also a great provider for built-in ASP.NET Core logging system. Furthermore, it does structured logging and provides all kinds of useful sinks. For example, in ASP.NET Core you can use the file sink, and with one extra line of code, you can direct your logging to output to the file. You can also use sinks to write to Azure, Amazon, CouchDB, MongoDB, SQL, etc.
New Meta Package - Microsoft.AspNetCore.All
Do use the new ASP.NET Core 2 Meta package - NuGet package name is Microsoft.AspNetCore.All. It is a meta package that includes tons of other packages by Microsoft that will get you going for most of the scenarios you run into. And with 2.0 SDK, only packages that you use in your application will be published, other packages will be trimmed from the output.
Feature Folders
We should have a root folder in our app project called Features, and children of that folder should be feature folders.
When you work on a new feature/task, you usually work on a particular part of the application, and you regularly change controller, views, models that are all connected, and they are pieces of this part of the application. Therefore, it makes sense to have all files related to the feature in same folder.
We can locate the code, identify what each file represents at a glance, the structure is flat as can be, and there are no repetitive nor redundant names.
For example:
- Features
- Notes
- NotesController.cs
- NotesViewModel.cs
- NotesEdit.cshtml
- Categories
- CategoriesController.cs
- CategoriesViewModel.cs
- CategoriesEdit.cshtml
- Notes
There is even NuGet package to make this working out of the box. You could achieve something similar with Areas or Razor Pages.
Controllers
Controllers should be nothing more than a facade. Most of us know about this, but so often we forget about it.
The controller should only connect outside request with the rest of your app. No validation logic, no mappings, no conversions, no data access.
You could check if ModelState is valid or not, other than that it should be slim and straightforward as possible.
Route Attribute
Scott recommends using **[Route]**attribute on Controller and its actions.
One of the reasons is that we can match route parameter names with an actual parameter of the method (action). I guess most of us had that weird errorwhere the route ID would not match. And that usually happens because we didn’t configure routing correctly and we were using MVC’s default route. Plus the name of the parameter seems more descriptive when it’s named categoryIdand not just id.
For example:
[Route("{categoryId}")]
[HttpPost, ValidateAntiForgeryToken]
public async Task<IActionResult> Create(int categoryId)
{

  return View();
}
or you could use it this way:
[HttpPost("{categoryId}")]
[ValidateAntiForgeryToken]
public async Task<IActionResult> Create(int categoryId)
{

  return View();
}
Whatever feels cleaner to you.
Also, we can use [Route] attribute to match controller or action name by using square brackets.
Instead of writing this:
[Route("api/Notes")]
public class NotesController : Controller
{

}
We can write this:
[Route("api/[controller]")]
public class NotesController : Controller
{

}
Swagger
Swagger is a machine readable representation of a RESTful API that enables support for interactive documentation, client SDK generation and discoverability.
Setting up a tool like Swagger usually takes just a couple of minutes. However, benefits are enormous. You get a great tool that you can use to document your API. Also, you can it use to have an excellent overview and a way to test your API.
XSRF in APIs
MVC always had means that you could use to protect your application from cross site scripting requests. In ASP.NET Core, forms that are built within ASP.NET Core the XSRF protection is enabled by default! Awesome.
But what about APIs? So, if you have an API and authentication happens implicitly and automatically, then you should think about this. An example would be cookie authentication, meaning that the browser will automatically authenticate the user by sending a cookie along. The question is how to get the token to our JavaScript code. Then, JavaScript will send that token along with requests to prevent XSRF attacks.
[Route("api/[controller]")]
public class XsrfTokenController: Controller {
 private readonly IAntiforgery _antiforgery;

 public XsrfTokenController(IAntiforgery antiforgery) {
  _antiforgery = antiforgery;
 }

 [HttpGet]
 public IActionResult Get() {
  var tokens = _antiforgery.GetAndStoreTokens(HttpContext);

  return new ObjectResult(new {
   token = tokens.RequestToken,
    tokenName = tokens.HeaderName
  });
 }
}
Using the built-in IAntiforgery service, we call the GetAndStoreTokens method. It will issue a Set-Cookie header (notice the HttpContext we are passing to this method) to the client to make sure that there is a cookie with one part of the XSRF token. Also, this method will return a request token that JS code needs to include, as well as the header name where we need to place that token.
XSRF for APIs only matters for APIs secured using Cookie auth, and in most cases, you shouldn’t even be doing that.
Embrace Security Policies
In ASP.NET Core we use Policies to check Claims requirements. The simplest type of claim policy looks for the presence of a claim and does not check the value.
services.AddAuthorization(options => { options.AddPolicy("StudentsOnly", policy => policy.RequireClaim("StudentId")); });
We can apply the policy using Authorize attribute to either Controller or Action:
[Authorize(Policy = "StudentsOnly")]
public IActionResult GetStudentInfo()
{
    return View();
}